How about you learn to create a new kind of blog on WordPress that helps you to make more money?
In the past, I have shared many techniques for you to make money from blogging. Few of the famous one are:
Today, I will be sharing another method which is popular among marketers to make money from niche website & it’s easy for you or anyone to pickup & make money.
Before that, let’s take a moment & think from a buyer’s perspective:
What’s the first thing you normally do before purchasing a new product or service?
If you’re like 81% of shoppers, you do search & read the review before making a purchase.
Think about that – 3 out of every 5 people look for reviews online before buying. That’s a lot of searches where people are primed to buy if they find the information they’re looking for.
You can be the one to provide that information by starting your own product review site. Product review sites open up huge avenues for traffic generation and monetization.
Especially if you wish to earn money using affiliate marketing, product reviews could do wonders for your overall blog income.
Reviews are perfect for driving traffic from long tail searches, and review sites can be monetized with a variety of powerful methods like affiliate marketing and sponsored content.
Today, I will be helping you create a review website using WordPress & earning money from it.
If you’re interested in getting into this highly lucrative niche, join me as I show you how to launch a WordPress product review site using the WP Product Review plugin from ThemeIsle.
Do note, our goal here is to create a site which should stand out in search engines & make users click on our desired link.
How to build & make money from a review WordPress site
Step 1: Pick a niche for your review site
This is the first step to ensure that your website will make money.
While giants like TopTenReviews have managed to create successful general review sites, if you’re an individual, you’ll definitely want to pick a specific niche.
Your niche is the specific category of products you’ll review.
For example, you could start a site that focused entirely on reviewing WordPress plugins, or drones, or mobile apps.
When picking your niche, try to answer questions like:
The best niche will be one where you can answer positively to all three questions.
To put another way:
Step 2: Pick a domain and hosting
Before you can get your review site up and running, you need to handle some backend details. Namely, buying a domain name and picking a hosting provider.
I already featured a post giving some guidelines for choosing a good domain name. In general, you’ll want something that’s brandable and easy to remember.
For hosting, you can pick one from Bluehost as they offer budget hosting + a free domain name. They’re affordable and more than powerful enough to get your site started.
Step 3: Install WordPress and choose a theme
If you went with Bluehost, you can install WordPress using their guide.
It only takes a few clicks.
If you picked another hosting provider, you’ll need to find instructions specific to them or follow my guide to manually install WordPress.
Once you’ve got WordPress installed, you’ll need to pick a theme that fits well with a review site. You’ll want something with plenty of room to feature visuals of the products you’re reviewing. Because your reviews will include lots of text, you’ll also want a theme that is easy for visitors to read.
If you’re not sure where to start looking for a theme, I’ve featured a list of good review site WordPress themes.
Otherwise, you can browse some of my recommended theme developers such as Genesis, MyThemeShop, and ThemeIsle.
Step 4: Install and configure WP Product Review plugin
Once you’ve got WordPress installed and you’ve set up your theme, you’re ready toinstall and configure the WP Product Review plugin.
The plugin comes in two versions:
If you’re serious about starting a review site, I recommend you go with the “Pro” version.
You’ll get powerful features like comparison tables, custom review icons, shortcodes, and a few other features that make it worth the purchase.
The unlimited “Pro” version comes with built-in Amazon integration which is perfect for launching an Amazon niche site.
For the purposes of the rest of this guide, I’ll be using the “Pro” version.
Product Review Settings:
To configure how your reviews look, go to “Product Review” → “Product Review”:

Here are the main settings you’ll want to configure under “General Settings”:
The other sections under “Product Review” deal with colors and typography. You should set them to match your site, but they’re self-explanatory so I won’t cover them in detail:
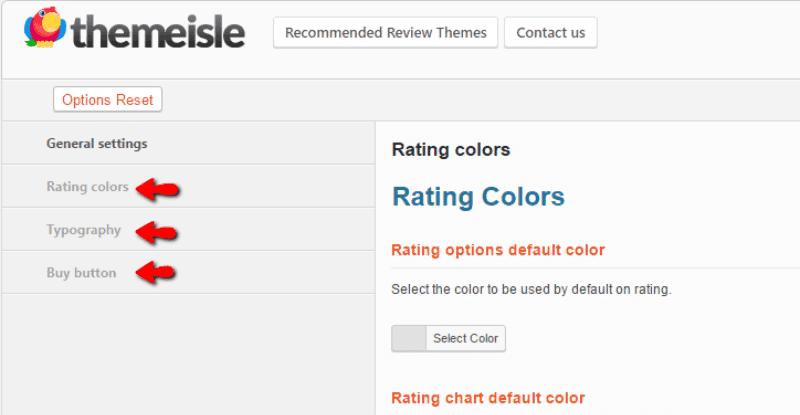
Comparison Table Settings:
Next, you’ll want to set up your product comparison settings. People like to be able to quickly compare products because it reinforces that they’re making the right choice.That’s why you’ll definitely want to include product comparisons on your site.
To set them up, go to “Product Review” → “Comparision Table Settings” (sic):
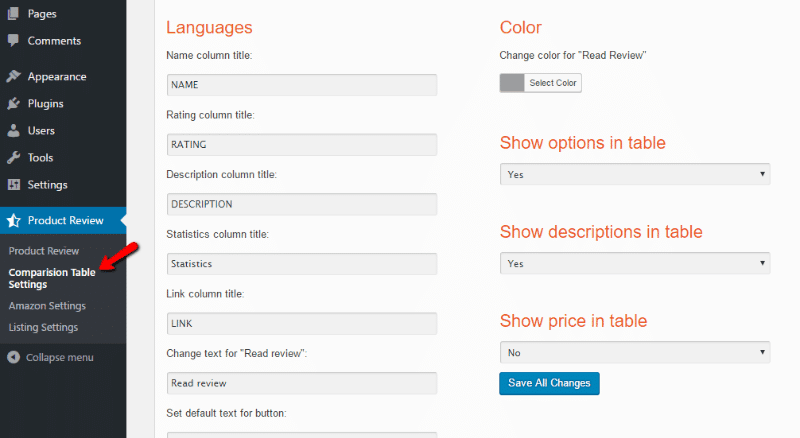
The left column is all about language. If your site is in English, you probably don’t need to change anything. But if you want to translate into a different language, you can do that here.
The right column has some settings you’ll want to consider:
Amazon Affiliate Settings:
If you purchase the unlimited “Pro” version, you’ll get automatic Amazon integration.
This means all your reviews will include a “Buy Now” button that displays the latest price. If someone purchases through this button, you’ll earn money through Amazon’s affiliate program.
To set up all the Amazon details, just go to “Product Review” → “Amazon Settings”:
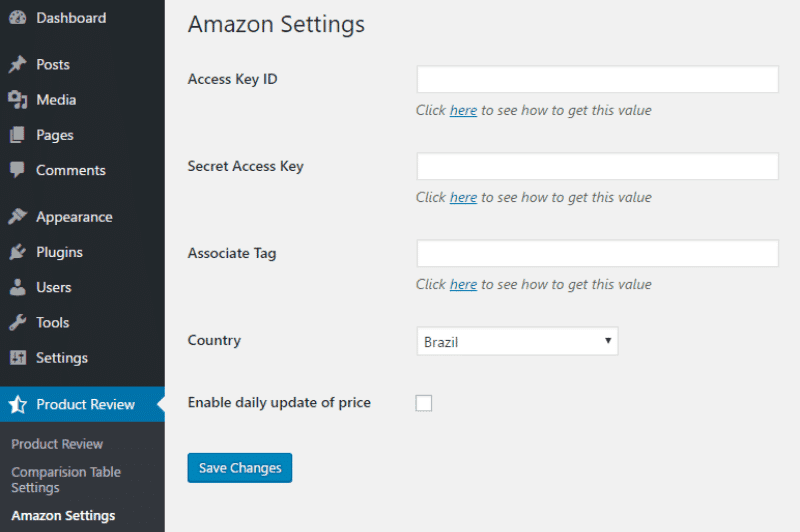
Enter your Amazon Associates information and the plugin will automatically handle everything else. You should also decide whether or not you want the plugin to update the price every day.
Listing Settings:
The last thing you need to set up is your Listing Settings. These allow you to create product grids where readers can click to “Read Review” or “Buy Now”:
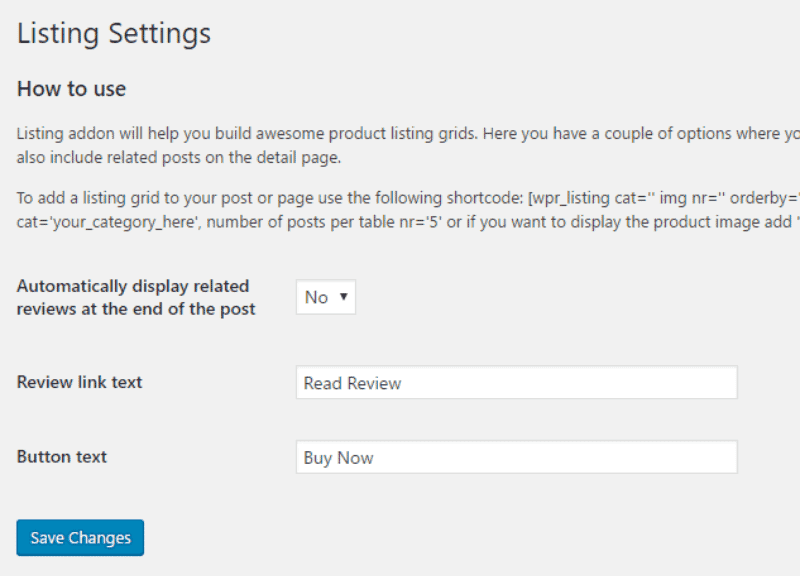
All you need to do is decide if you want to automatically display related reviews at the end of posts and enter your desired text for the buttons.
Step 5: Start reviewing products
Now that the plugin is all set up, it’s time for the fun part:
Writing reviews.
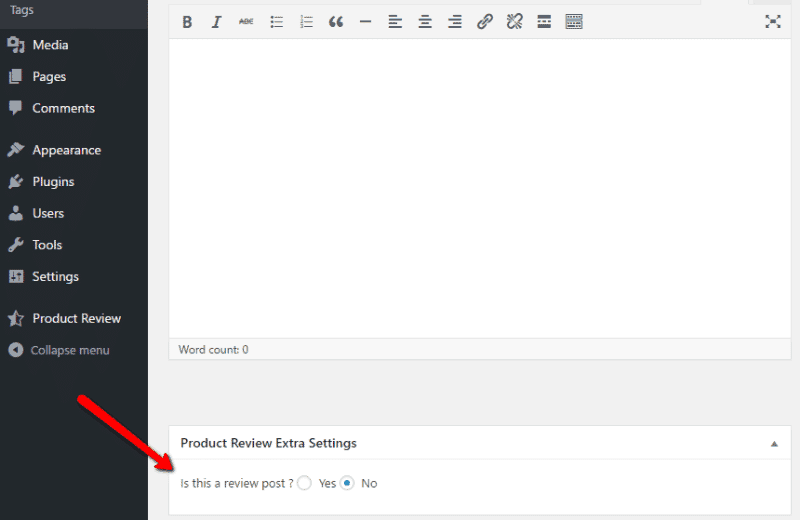
When you go to publish a new post, you’ll now see an option to choose whether or not the post is a review:
If you choose “Yes”, you’ll see a bunch of options to set up the review box:
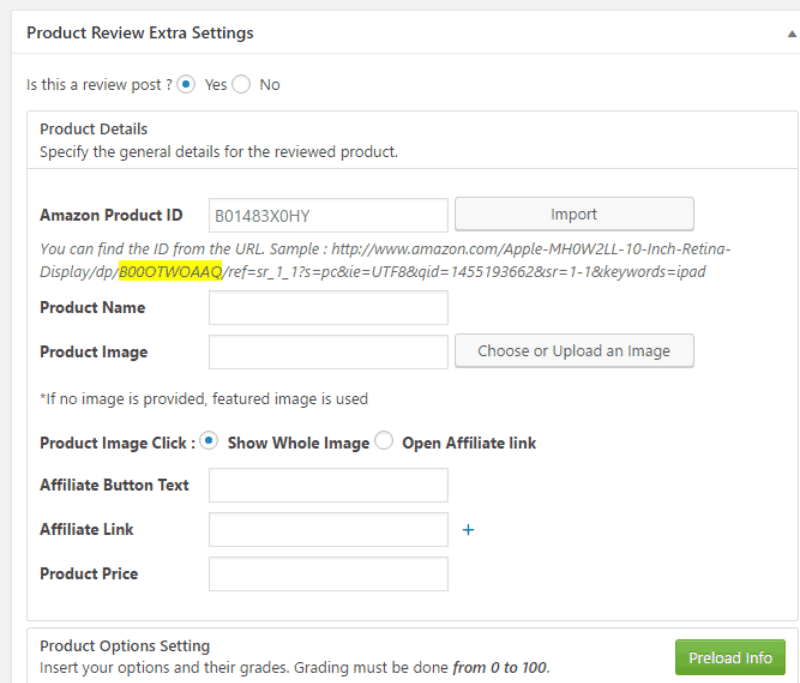
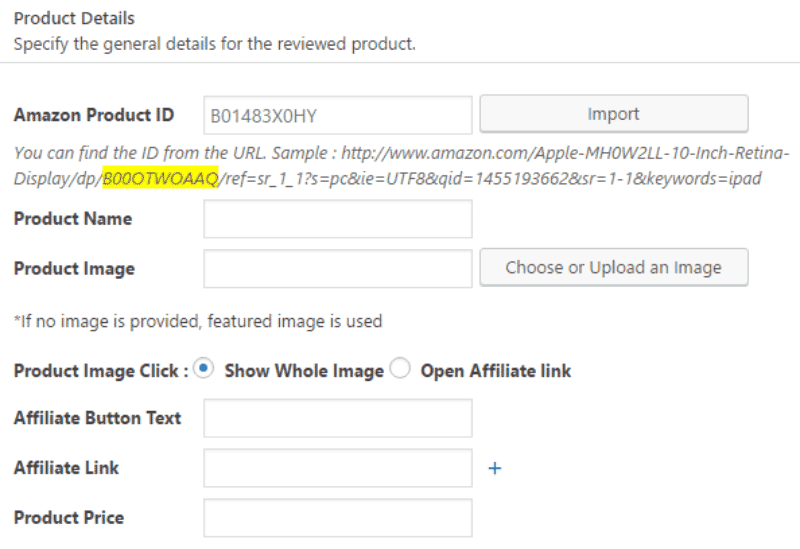
First, you’ll need to enter the product name/image and some information for the affiliate program you’re using:
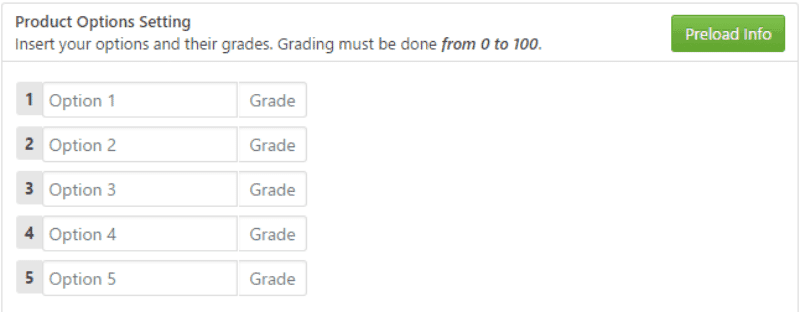
Next, you’ll need to enter the main product options/features and a grade from 0 to 100:
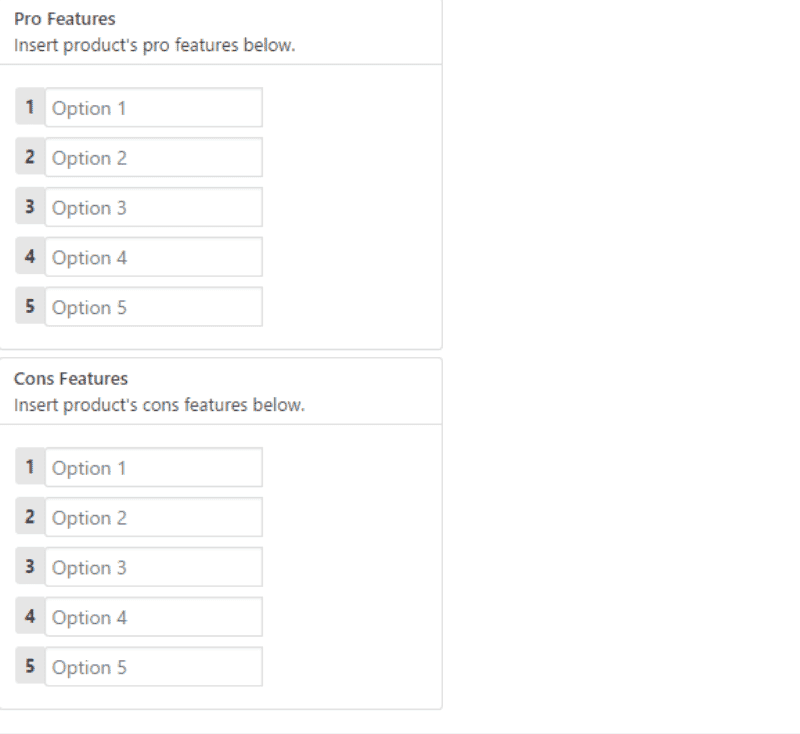
And finally, you’ll need to enter the product’s pros/cons:
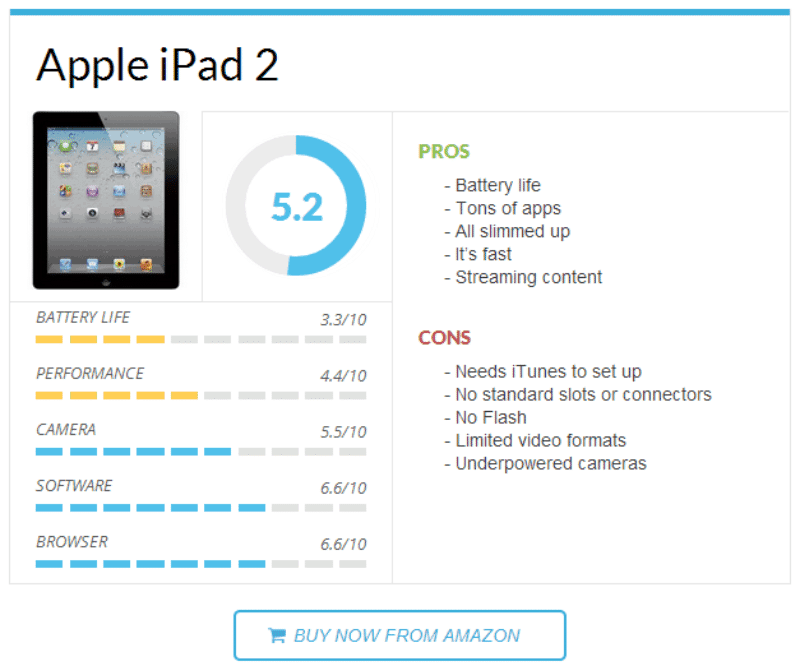
Once you’ve entered everything and published your post, you should get something that looks like this:
Step 6: Grow your blog and monetize
Once you start writing reviews and publishing comparison tables, you’ll naturally want to continue to grow your site and add new revenue streams.
Because those are huge topics, I’ve included some assigned reading…
Getting Traffic to Your Review Site:
Monetizing Your Review Site:
Review sites are very similar to traditional blogs. So, a lot of the topics I talk about on ShoutMeLoud will also apply to your review site.
If you write quality reviews and promote them well, you’ll start to get organic traffic to your site and be on the path to generating recurring passive income.

![How to Set Up Yoast WordPress SEO Plugin [Updated] - Issue with Adding meta description & title in latest SEO Yoast plugin](https://blogger.googleusercontent.com/img/b/R29vZ2xl/AVvXsEgy2bhkLyFcPaMGW-EXe0NGXBlW3ihDy3G3OuXXQi8SOX0e8E-RSfRsHStfyBqp48fi2WhniL9kYY3_GI3UUzfBSUrp-R09FZXGpwId3fRRBQM1sdzfoawiREDSXzrAx5hMYP5ZbQLt3Gmj/s72-c/2016-09-22+at+04-05-55.png)


No comments:
Post a Comment