Earlier I wrote about how to configure W3 Total Cache and also a little about Google Page Speed.
The latest version of W3 Total Cache allows you to integrate with Google Page Speed to see the performance of your site. The faster your site is, the better it is for search engine ranking.
In this guide, I will be sharing how to enable Google Page Speed inside of W3 Total Cache.
I’m assuming you have installed the W3 Total Cache plugin. If you want to know why you should install it right now, W3 Total Cache is a powerful caching plugin for WordPress which helps in loading your site faster.

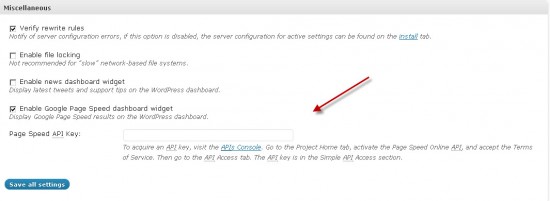
Once you have installed W3 Total Cache, go to the plugin settings and click on the tab“Miscellaneous”.
Click on “Enable Google Page Speed dashboard widget”.
You need to enter a Page Speed API to enable this feature.
How to get a Google Page Speed API?
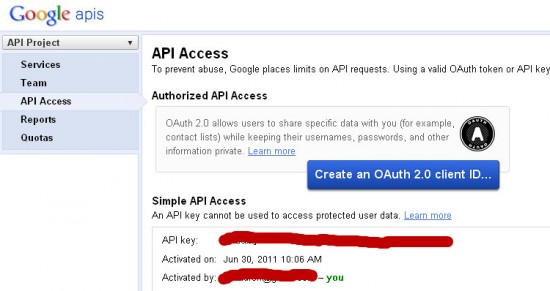
Go to the Google API homepage and login with your Google ID. Look for the option “Page Speed Online API” and switch it ON.

Now click on the “API Access” tab on the left sidebar and you will see your API key.
(Important: Don’t share your API key with anyone else.)

Copy the Google API key to the W3 Total Cache settings and click on “Save”. It might take some time to see the result on your dashboard.
This is a very useful feature and will help you to see how your site is performing along with actions you can take to speed up your website.
Do let us know which WordPress cache plugin you are using for your blog. Are you a Super Cache plugin user or are you using W3 Total Cache? Have you linked it with Google Page Speed? Let me know your experiences in the comments below!


![How to Set Up Yoast WordPress SEO Plugin [Updated] - Issue with Adding meta description & title in latest SEO Yoast plugin](https://blogger.googleusercontent.com/img/b/R29vZ2xl/AVvXsEgy2bhkLyFcPaMGW-EXe0NGXBlW3ihDy3G3OuXXQi8SOX0e8E-RSfRsHStfyBqp48fi2WhniL9kYY3_GI3UUzfBSUrp-R09FZXGpwId3fRRBQM1sdzfoawiREDSXzrAx5hMYP5ZbQLt3Gmj/s72-c/2016-09-22+at+04-05-55.png)


No comments:
Post a Comment